
There’s nothing worse than a beautiful layout that has been badly photographed. It’s not always that easy getting the perfect shot of your artwork if you don’t have the right tools. By the right tools I mean Studio lights, speed lights, tri-pods and hi-end cameras with top of the range lenses. I never used to have all of those and only acquired some of these in the last year.
So how can you at home photograph your layouts – I am sharing some of my “how to photograph your scrapbook layouts” tips and tricks that I have learned throughout my career of spending lots of time with professional photographers and my own experience. **The below steps is a beginners guideline that has helped me over the years, you will most likely not be a pro and it does take lots of practice
Photographing from above and editing
- Find a spot in your home that has lots of nice natural light. This is typically next to a window with nice and bright light streaming in. You can also go outside under a covered stoep or patio – as I do since our thatch house is so very dark inside. I do want to point out that it is best to have light that is indirect or diffused rather than harsh direct light shining right on your layout.
- It is also best to photograph your layouts during the day when you have nice light so you don’t have to use your flash. If you do it at night with your flash, your layouts will look more flat and less 3-dimensional and you also may get some bad shadows and flash spots on your photos. Photographing at night will cause colours to be off.
- Find something to use as a background for your layout. You are looking for a clean solid white background that doesn’t distract from your layouts. There are lots of things you can use for example a sheet of white project board, a large flat canvas, mounting board or even a white bedding sheet, plastic sheeting used for infinity curves etc.
- Simply place your layout on your background and make sure you have good lighting without any sunspots directly on your layout.
- To photograph the layout I stand directly above it and get in close enough (either physically or with the zoom on my lens) so that you are filling the frame with your background and layout. I always leave about an inch or 2 of the white background all around the image visible. The white board also reflects some light which is good.
- You can also use a tri-pod here (recommended) and a remote control for your camera. Position the tri-pod directly over your layout and then photograph it to avoid any camera shake and blurry images.
- After photographing the layout I upload it to my computer for editing. When taking the picture I try to make sure that the layout is straight but if it is off a little I have a “Straightening tool” and “Perspective Correction Tool” in my editing software to get it perfectly straight without any distortions. I crop and size my image for web with a 150dpi which is nice enough to see details but small enough not to load for ages (a pet hate).
- Now it’s time to get up close and personal and take some close up images to show details, texture and patterns or focus on something specific you used or want to show off. I normally use a Macro lens for this or simply turn my settings to “Macro” the little flower on your camera.
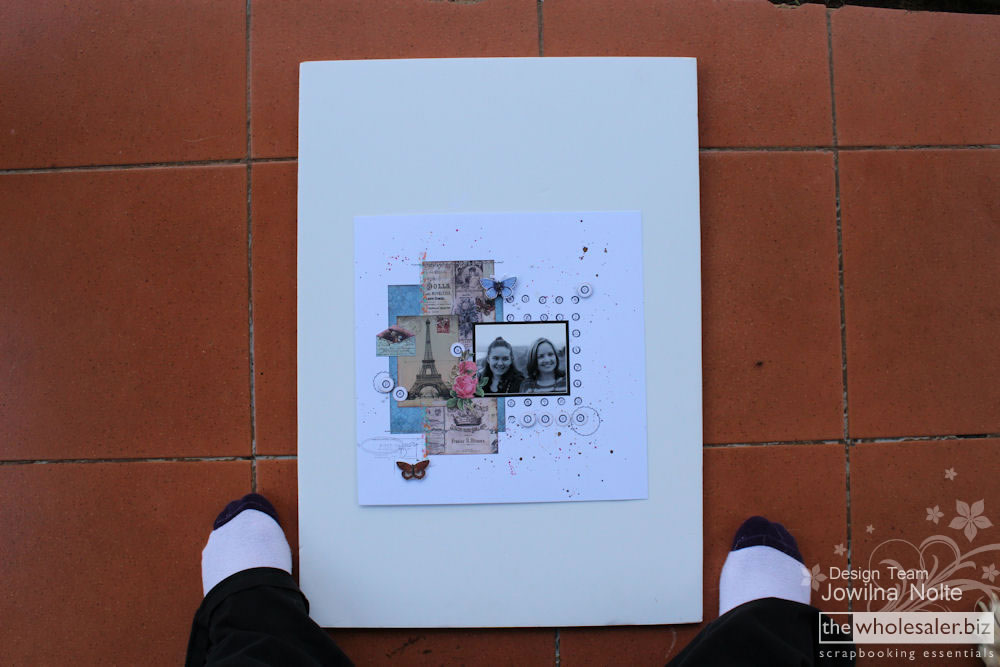
Photographing your layouts head-on
Unlike above, in winter I photograph my layouts head on. I also attach my layouts to my white infinity curve board using mounting squares and then place the board on a window sill outside. The reason I do this in winter is because the lighting is very different to the harsh summer light and I have no issues with the sunlight ending up directly on my layout.
I stand in front of the board directly facing my layout with feet apart to steady myself. I have a steady enough hand and just shoot away, but you could also use a tri-pod which is always better and recommended.
Once I have my images I edit them for web publishing.
Photographing your layouts head on is another option if you don’t have a steady hand or a tri-pod. I recommend this for most people – it’s a simple way of making sure your layout is straight and in focus. I have seen some amazing scrappers and bloggers with images that are always out of focus.
Some other tips
I never use a flash when photographing my layouts – flash is a mood destroyer
I always shoot in “P” Program Mode or “M” Manual mode – this allows me to set the camera to specific settings, like ISO speed, Shutter speed, Aperture, White Balance (WB)
ISO, Shutter speed, Aperture and brightness of light are variables. They will always change depending on the light and the shooting situation so be prepared for that!
Setting the white balance can help when photographing indoors to avoid things looking too blue. Shooting indoors you are dealing with “manmade lights” that will have an effect on your camera hence the blueness of a photo. It helps to know your camera and how it works – changing settings and getting off of “Auto” is a must!
Invest in a tri-pod – it will be worth the money spent in gold.

And after all this – the best advice I have is, do not be in a hurry when photographing your layouts. Take your time and have a steady hand, wait for good lighting outside and keep a white background separate and don’t use it for anything but a background to keep it crisp and clean. Oh…and go and buy that tri-pod this year!


10 Comments.
What does the umbrella do?
awesome article!
Now you have me stumped (obviously no photographers here..ha-ha!) I did search “lighting umbrella” and noticed quite a few results, but I might lead you astray if I send you those links. Jowilna (Scrapcouture) help!!!???
I try to photograph my pages from above but always seem to end up with a curve on one edge. Guess I need a lot more practice on this one.
I usually scan my layouts on our A3 printer at work and then crop them… it looses the bottom 1cm but I’m not too fussed about that! At least this way I don’t get the blurry images or curved edges.
The umbrella is part of the Studio light set and reflects light, it acts as a diffuser and makes for even and softer lighting. The actual light is behind the umbrellas in the centre and everything is on a stand. My speed-light (external flash) on my camera triggers the lights and makes them go ‘off’. A very simple explanation in my own words.
The umbrella is part of the Studio light set and reflects light, it acts as a diffuser and makes for even and softer lighting. The actual light is behind the umbrellas in the centre and everything is on a stand. My speed-light (external flash) on my camera triggers the lights and makes them go ‘off’. A very simple explanation in my own words.
PS. I am by no means a professional when it comes to studio lighting but have improved my photography hugely by using lights to get even lighting and better photos.
Hubby bought me a tripod about 5 years ago.. if I took it out he would have a heart attack.. I’m sure he thinks I sold it.. LOL.. will have to dig it out..
Thanks Jowilna!
Thanks Jowilna, nice a simple :)
Thanks so much! Had no idea whatsoever.